TVM加入新后端的方式1——BYOC

BYOC

BYOC的全称是Bring You Own Codegen,也就是自定义代码生成。BYOC的输入为Relay图,也就是输入框架经过翻译后成为高层的语言。而输出取决与硬件方提供的编译器环境,可以是c语言、CUDA、JSON等。但是通过阅读官方文档可以发现,并没有生成LLVM IR的说法,因此通过BYOC生成LLVM IR有待商榷。

下面通过TVM官方的How to Bring Your Own Codegen的例子,来说明BYOC的pipeline。

BYOC工作流程

image-20230410214702547

上图是给定的一个Relay图,下面是BYOC框架的执行流程:

  1. 图注解
    在获得用户提供的Relay图后,TVM第一步是对图中可能offloaded到加速器的节点进行注解。需要遵循一定的规则去实现一份支持算子的白名单,或者一个自定义的符合算子的图匹配列表。经过图注解,形成的计算图如下:

    image-20230410214748530
  2. 图转换(Transformation)
    TVM第二步是在注解图上进行转换和优化。与普通的转换不同,BYOC执行的转换如下:

    • 合并编译区域:在图2中通过黑色框可见有许多编译区在图上,需要被加载到加速器上。实际上它们可以被合并,从而减少数据传输以及内核启动开销。在这一步中使用了贪心算法,让尽可能多的区域合并,同时保证功能正确,结果如图3所示。image-20230410214802068
    • 划分图:对于上一步得到的每一个区域,TVM生成一个带编译器属性的Relay函数,用来表明该Relay函数需要完全卸载到加速器上,结果如图4所示:
      image-20230410214810390
  3. 代码生成
    到目前为止TVM已经知道了Relay图那一部分应该被卸载到硬件上。在这一步中,TVM将一次将每个带有your_acceleratorRelay 函数发送到你的代码生成模块。自定义代码生成模块需要编译Relay函数为符合你自己编译流的执行格式,这可以是C源码或者其他文本格式。
    最后,所有需要被编译的函数和其他没有被卸载的Relay函数都一起由外部PythonAPI序列化为一个.so文件。用户在这一阶段只能获得一个.so文件。

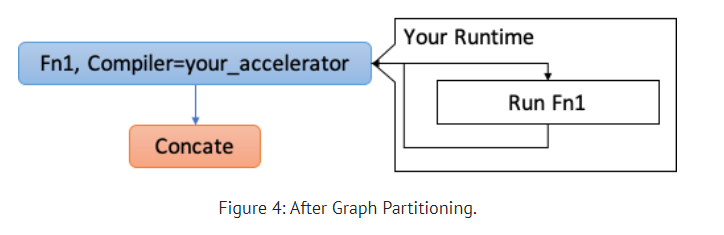
  4. 运行时
    开发者还可能需要实现一个运行时来初始化自己的图引擎并且执行编译的函数。在推断期间,当TVM运行时遇到相应的功能调用时,TVM运行时会利用自定义的运行时来调用卸载功能。Your runtime is responsible for launching the compiled function with the given input tensor arrays and filling in the results to the output tensor arrays.

示例代码:Bring DNNL to TVM

DNNL(Deep Neural Network Library)使用C++实现的一些深度学习库。

创建注解规则

BYOC框架提供了两种方式去描述支持的算子和模式(patterns)。开发者可以同时使用它们。完整的实现可以从这里找到。注意TVM需要你把你自己的代码生成注解规则放在python/tvm/relay/op/contrib/your_codegen_name.py

单个算子的注解规则

开发者可以通过BYOC API直观的指定加速器中支持那些Relay算子。例如,下列代码块构建了一个规则:自定义的DNNL代码生成支持Conv2D。这个注解给Relay nn.conv2d算子注册了一个target.dnn1的新属性。通过这个方式,BYOC可以通过为每个算子调用target.dnn1()从而检查算子是否在DNNL代码生成中支持。

1
2
3
@tvm.ir.register_op_attr("nn.conv2d", "target.dnn1")
def _dnn1_conv2d_wrapper(attrs, args):
return True

不过为每个算子都写上述代码可能很乏味。对于DNNL实现,可以使用一个helper函数_register_external_op_helper,从而简化操作。如下面代码所示:

1
2
3
4
5
6
7
8
9
10
11
12
13
14
def _register_external_op_helper(op_name, supported=True):
@tvm.ir.register_op_attr(op_name, "target.dnn1")
def _func_wrapper(attrs, args):
return supported
retrun _func_wrapper

# DNNL支持的算子
_register_external_op_helper("nn.batch_norm")
_register_external_op_helper("nn.conv2d")
_register_external_op_helper("nn.dense")
_register_external_op_helper("nn.relu")
_register_external_op_helper("add")
_register_external_op_helper("subtract")
_register_external_op_helper("multiply")

图模式的注解规则

开发者的加速器或者编译器可能已经优化了一些模式(比如Conv2D+add+ReLU)为单个指令或者单个API。因此,开发者需要指明从一个计算图模式到自己的指令或者API的映射关系。

对于DNNL例子,它的Conv2D API已经包含了偏置add并且也允许后面的ReLU一起执行。因此我们调用下面的代码使用DNNL(完整的在这里

1
2
3
4
5
6
7
8
9
10
11
12
13
14
15
16
17
18
19
DNNLConv2d(const bool has_bias = false, const bool has_relu = false) {
// ... skip ...
auto conv_desc = dnnl::convolution_forward::desc(
dnnl::prop_kind::forward_inference,
dnnl::algorithm::convolution_direct,
conv_src_md, conv_weights_md, conv_bias_md, conv_dst_md,
strides_dims, padding_dims_l, padding_dims_r);

// Attach ReLU
dnnl::primitive_attr attr;
if (has_relu) {
dnnl::post_ops ops;
ops.append_eltwise(1.f, dnnl::algorithm::eltwise_relu, 0.f, 0.f);
attr.set_post_ops(ops);
}

auto conv2d_prim_desc = dnnl::convolution_forward::primitive_desc(
conv_desc, attr, engine_);
// ... skip ...

在这个例子中除了单个conv2d,还可以映射图模式conv2d+reluDNNConv2d(false, true),或者映射conv2d+add+reluDNNLConv2d(true, true)

我们可以通过代码实现映射:

首先是利用不同名字实现了两个pattern从而我们可以很简单的在代码生成中识别它们。注意这些pattern都是通过Relay pattern语言实现的,需要学习使用写自己的patterns参考这篇

1
2
3
4
5
6
7
8
9
10
11
12
13
14
15
16
17
def make_pattern(with_bias=True):
data = wildcard()
weight = wildcard()
bias = wildcard()
conv = is_op('nn.conv2d')(data, weight)
if with_bias:
conv_out = is_op(add)(conv, bias)
else:
conv_out = conv
return is_op('nn.relu')(conv_out)

@register_pattern_table("dnn1")
def pattern_table():
conv2d_bias_relu_pat = ("dnnl.conv2d_bias_relu", make_pattern(with_bias=True))
conv2d_relu_pat = ("dnnl.conv2d_relu", make_pattern(with_bias=False))
dnnl_patterns = [conv2d_bias_relu_pat, conv2d_relu_pat]
return dnn1_patterns

通过pattern表,我们可以使用一个Relay Pass来执行翻译。该翻译可以将下面代码进行转换:

1
2
3
4
5
6
7
8
9
10
11
12
13
14
15
%1 = nn.conv2d(%data, %weight, ...)
%2 = add(%1, %bias)
%3 = nn.relu(%2)
||
||
||
\/
%1 = fn(%input1, %input2, %input3,
Composite="dnnl.conv2d_bias_relu",
PartitionedFromPattern="nn.conv2d_add_nn.relu_") {
%1 = nn.conv2d(%input1, %input2, ...)
%2 = add(%1, %input3)
nn.relu(%2)
}
%2 = %1(%data, %weight, %bias)

从而DNNL代码生成器可以或者pattern名字conv2d_bias_relu并且将%1映射为DNNConv2d(true, true)

PartitionedFromPattern属性

上面的PartitionedFromPattern属性适用于pattern包含通配符(wilcard)的情况。举例来说我们可能有一个pattern表("conv2d_with_something", conv2d -> *)

1
2
3
4
5
def make_pattern(with_bias=True):
data = wildcard()
weight = wildcard()
conv = is_op('nn.conv2d')(data, weight)
return wildcard()(conv)

这种情况下,你将获得一个带有Composite=conv2d_with_something属性的复合函数,但是你不知道它实际匹配的是什么计算图。这时候PartitionedFromPattern就有作用了,你可以通过查看PartitionedFromPattern来查看该函数是不是 nn.conv2d_add_或者nn.conv2d_nn.relu_,从而确定匹配的图形是否为conv2d->addconv2d->relu

Relay计算图转换

上一步中我们定义了注解规则,这一步可以应用BYOC Relay的Pass从而将Relay计算图转换为划分过的计算图。

1
2
3
4
5
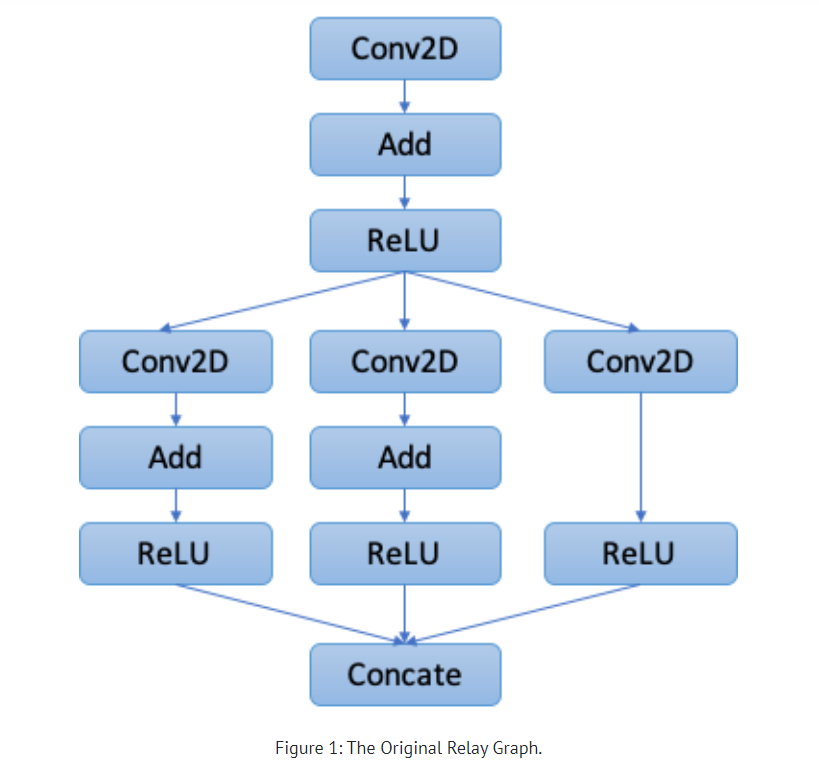
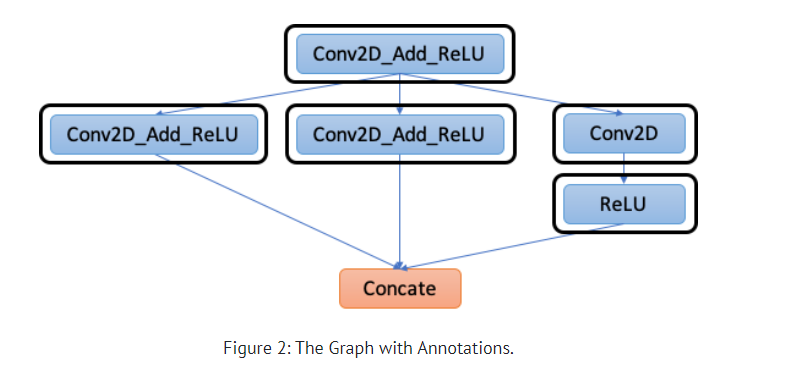
mod = create_relay_module_from_model() # Output: The Original Relay Graph
mod = transform.MergeComposite(pattern_table)(mod)
mod = transform.AnnotateTarget(["dnnl"])(mod) # Output: The Graph with Annotations
mod = transform.MergeCompilerRegions()(mod) # Output: The Graph after merging compiler regions
mod = transform.PartitionGraph()(mod) # Output: The Graph After Graph Partitioning

C代码生成

下面是对官方文档中TVM代码生成DNNL(C代码)的示例过程。

该例子在TVM源码中也保存有,如果需要先确保DNNL在本地机器上可用,并且在TVM的配置文件config.cmake中加入set(USE_DNNL_CODEGENC_SRC),表示启用该代码生成,并编译TVM。

DNNL代码生成在src/relay/backend/contrib/dnn1/codegen.cc中实现,在目前的实现中采用了两种形式实现了DNNL Codegen,一种是生成DNNL相关C文件,另一种是生成JSON相关文件。在追踪代码时注意没有被USE_JSON_RUNTIME宏覆盖的部分即可。

首先我们需要通过TVM注册功能的API注册我们的codegen,该代码示例如下。这个API使得TVM编译器发送带有Compiler=<your codegen>的Relay函数到relay.ext.<your codegen>,也就是将带有属性的Relay函数发送给自定义的codegen。代码链接

1
TVM_REGISTER_GLOBAL("relay.ext.dnnl").set_body_typed(DNNLCompiler);

然后我们实现DNNL编译器的入口函数:代码链接(忽略了JSON的实现),注意每个runtime模块只负责一个Relay函数,这意味着我们可以从单个.so文件中找到倒戈DNNLruntime模块。

1
2
3
4
5
runtime::Module DNNLCompiler(const ObjectRef& ref) {
DNNLModuleCodegen dnnl;
return dnnl.CreateCSourceModule(ref);
}
TVM_REGISTER_GLOBAL("relay.ext.dnnl").set_body_typed(DNNLCompiler);

接着我们派生一个CsourceModuleCodegenBase来实现上面的DNNLModuleCodegen(第一个代码块)。尽管CsourceModuleCodegenBase负责例如序列化等其他模块级别的过程,但是我们只需要在CreateCSourceModule实现DNNL代码生成。代码链接

1
2
3
4
5
6
7
8
9
10
11
12
13
14
15
16
17
18
19
20
21
22
23
24
25
26
27
28
29
30
31
32
33
34
35
36
37
38
39
40
41
42
43
44
45
46
47
48
49
50
51
52
53
54
55
56
57
58
59
60
61
62
63
class DNNLModuleCodegen : public CSourceModuleCodegenBase {
public:
// Create a corresponding DNNL function for the given relay Function.
std::pair<std::string, Array<String>> GenDNNLFunc(const Function& func) {
...
}

/*!
* \brief The overridden function that will create a CSourceModule. In order
* to compile the generated C source code, users need to specify the paths to
* some libraries, including some TVM required and dnnl specific ones. To make
* linking simpiler, the DNNL kernels are wrapped in a TVM compatible manner
* and live under tvm/src/runtime/contrib/dnnl folder.
*
* \param ref An object ref that could be either a Relay function or module.
*
* \return The runtime module that contains C source code.
*/
runtime::Module CreateCSourceModule(const ObjectRef& ref) override {
// Create headers
code_stream_ << "#include <cstdint>\n";
code_stream_ << "#include <cstdlib>\n";
code_stream_ << "#include <cstring>\n";
code_stream_ << "#include <vector>\n";
code_stream_ << "#include <tvm/runtime/c_runtime_api.h>\n";
code_stream_ << "#include <tvm/runtime/container.h>\n";
code_stream_ << "#include <tvm/runtime/packed_func.h>\n";
code_stream_ << "#include <dlpack/dlpack.h>\n";
// dnnl_kernel file is saved under src/runtime/contrib/dnnl so that we don't
// expose it to ordinary users. To make export_library use it, users need to
// pass -I${PATH_TO_TVM}/src/runtime/contrib
code_stream_ << "#include <dnnl/dnnl_kernel.h>\n";
code_stream_ << "using namespace tvm::runtime;\n";
code_stream_ << "using namespace tvm::runtime::contrib;\n";
code_stream_ << "\n";

// "ref" should be the paritioned Relay function with kCompiler=dnnl.
CHECK(ref->IsInstance<FunctionNode>());
auto res = GenDNNLFunc(Downcast<Function>(ref));

// "code" is the generated C code with DNNL APIs.
std::string code = code_stream_.str();
// "res" is a tuple of constant weights (symbols, values).
// All constant tensors will be serialzied along with the generated C code
// when export_library is invoked.
String sym = std::get<0>(res);
Array<String> variables = std::get<1>(res);

// Create a CSource module
const auto* pf = runtime::Registry::Get("runtime.CSourceModuleCreate");
CHECK(pf != nullptr) << "Cannot find csource module to create the external runtime module";
return (*pf)(code, "c", sym, variables);
}

private:
/*!
* \brief The code stream that prints the code that will be compiled using
* external codegen tools.
*/
std::ostringstream code_stream_;
};

#else // DNNL JSON runtime

接下来,我们需要实现上面代码中的39行的GeeDNNLFunc从而生成使用了DNNL API的C代码。需要生成的C++代码样例也在下面给出。

1
2
3
4
5
6
7
8
9
10
11
12
13
14
15
16
17
class DNNLModuleCodegen : public CSourceModuleCodegenBase {
public:
// Create a corresponding DNNL function for the given relay Function.
std::pair<std::string, Array<String>> GenDNNLFunc(const Function& func) {
CHECK(func.defined()) << "Input error: expect a Relay function.";

// Record the external symbol for runtime lookup.
auto sid = GetExtSymbol(func);

CodegenDNNL builder(sid);
auto out = builder.VisitExpr(func->body);
code_stream_ << builder.JIT(out);

return {sid, builder.const_vars_};
}
......
}

请注意,下面生成的结果是由Relay图:conv2d -> add -> relu得来。并且代码中用到了很多预先定义的基于算子的DNNL函数,它们被定义在src/runtime/contrib/dnnl/dnnl.cc中。

1
2
3
4
5
6
7
8
9
10
11
12
13
14
15
16
17
18
19
20
21
22
23
24
25
26
27
28
29
30
31
32
33
34
35
36
37
38
39
40
41
42
43
44
45
46
47
48
49
50
#include <cstdint>
#include <cstdlib>
#include <cstring>
#include <vector>
#include <tvm/runtime/c_runtime_api.h>
#include <tvm/runtime/container.h>
#include <tvm/runtime/packed_func.h>
#include <dlpack/dlpack.h>
#include <dnnl/dnnl_kernel.h>
using namespace tvm::runtime;
using namespace tvm::runtime::contrib;

// Execute the conv2d->add->relu graph with DNNL.
extern "C" void dnnl_0_(float* dnnl_0_i0, float* dnnl_0_i1,
float* dnnl_0_i2, float* out0) {
// Allocate intermediate buffers.
float* buf_0 = (float*)std::malloc(4 * 4608);
float* buf_1 = (float*)std::malloc(4 * 4608);
float* buf_2 = (float*)std::malloc(4 * 4608);

// Pre-implemented op-based DNNL functions.
dnnl_conv2d(dnnl_0_i0, dnnl_0_i1, buf_0, 1, 32, 14, 14, 32, 1, 0, 0, 3, 3, 1, 1);
dnnl_add(buf_0, dnnl_0_i2, buf_1, 1, 32, 12, 12);
dnnl_relu(buf_1, buf_2, 1, 32, 12, 12);

// Copy the final output to the corresponding buffer.
std::memcpy(out0, buf_2, 4 * 4608);
std::free(buf_0);
std::free(buf_1);
std::free(buf_2);
}

// The wrapper function with all arguments in DLTensor type.
extern "C" int dnnl_0_wrapper_(DLTensor* arg0,
DLTensor* arg1,
DLTensor* arg2,
DLTensor* out0) {

// Cast all DLTensor to primitive type buffers and invoke the above
// execution function.
dnnl_0_(static_cast<float*>(arg0->data),
static_cast<float*>(arg1->data),
static_cast<float*>(arg2->data),
static_cast<float*>(out0->data));
return 0;
}

// The TVM macro to generate TVM runtime compatible function "dnnl_0"
// from our generated "dnnl_0_wrapper_".
TVM_DLL_EXPORT_TYPED_FUNC(dnnl_0, dnnl_0_wrapper_);

由于src/relay/backend/contrib/dnnl/codegen.cc中的其他实现太过于依赖DNNL,无法在官方教学文档中深入讨论,因此仅讨论这一个实现。

主要思想是实现一个Relay图的访问器L138,从而访问给定的Relay函数,并且生成对应的C代码。只要我们自定义的代码生成器可以生成和TVM 运行时兼容的C代码,我们就可以完全自定义代码生成codegen来满足要求。

C源码编译

在上面实现的DNNLCompiler中实际上只是输出了一个能生成c代码的文本格式模块,它并没有被gcc编译为可执行二进制文件。实际上,产生的C代码将会由用户调用export_libray(mod)来编译,如下面示例代码所示:

1
2
3
4
5
6
7
8
9
10
11
12
13
14
15
16
17
18
19
20
21
22
23
24
def update_lib(lib):
# Include the path of src/runtime/contrib/dnnl/dnnl.cc
test_dir = os.path.dirname(os.path.realpath(os.path.expanduser(__file__)))
source_dir = os.path.join(test_dir, "..", "..", "..")
contrib_path = os.path.join(source_dir, "src", "runtime", "contrib")

# Setup the gcc flag to compile DNNL code.
kwargs = {}
kwargs["options"] = ["-O2", "-std=c++14", "-I" + contrib_path]
tmp_path = util.tempdir()
lib_name = 'lib.so'
lib_path = tmp_path.relpath(lib_name)

# The generated C code with DNNL APIs is compiled to a binary lib.so.
lib.export_library(lib_path, fcompile=False, **kwargs)

# Load the lib.so back to a runtime module.
lib = runtime.load_module(lib_path)
return lib

with tvm.transform.PassContext(opt_level=3):
json, lib, param = relay.build(mod, target=target, params=params)
lib = update_lib(lib)
rt_mod = tvm.contrib.graph_runtime.create(json, lib, ctx)

使用DNNL Codegen/Runtime构建TVM

最后我们创建一个cmake/modules/contrib/DNNL.cmake从而让TVM构建时同时构建DNNL的代码生成模块。

当这个cmake文件创建好后,用户可以直接在build/config.cmake中使用set(USE_DNNL_CODEGEN ON)来启动DNNL的代码生成器。